

目录导航
Findomain简介
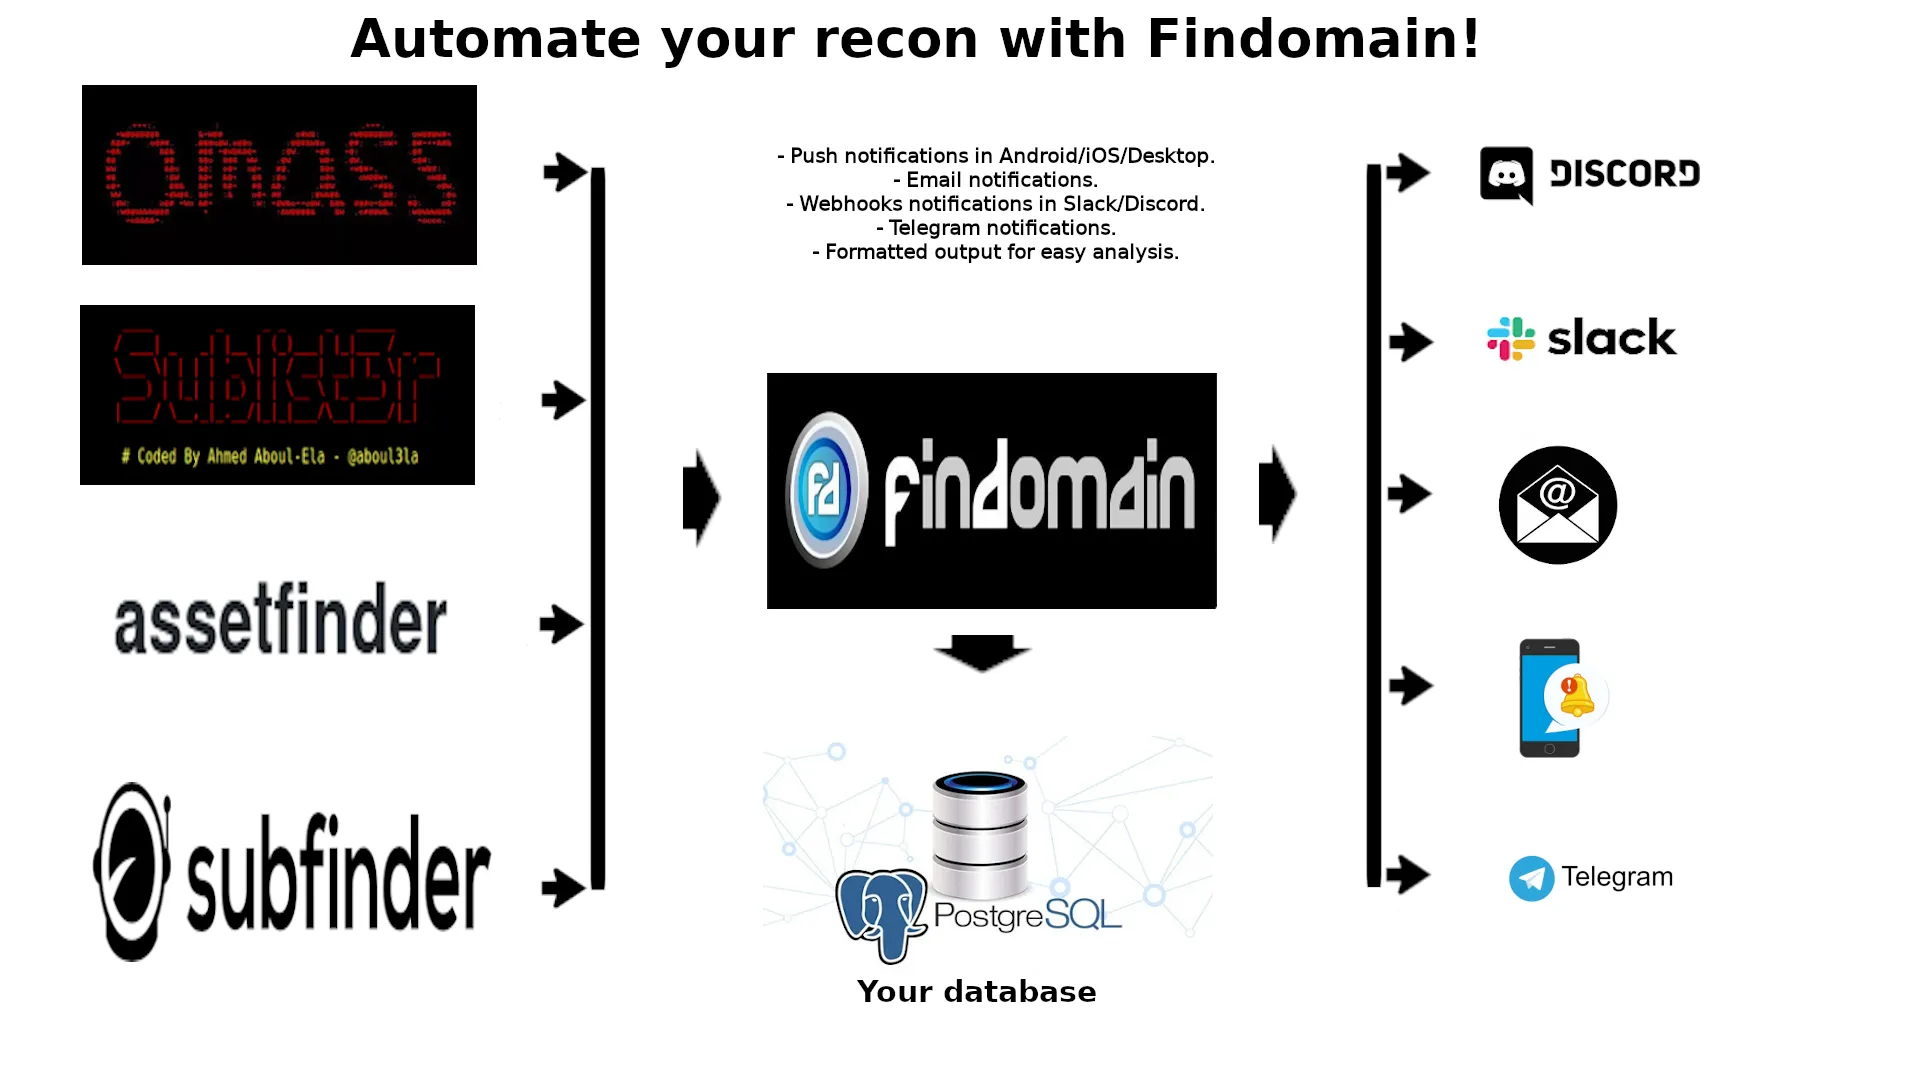
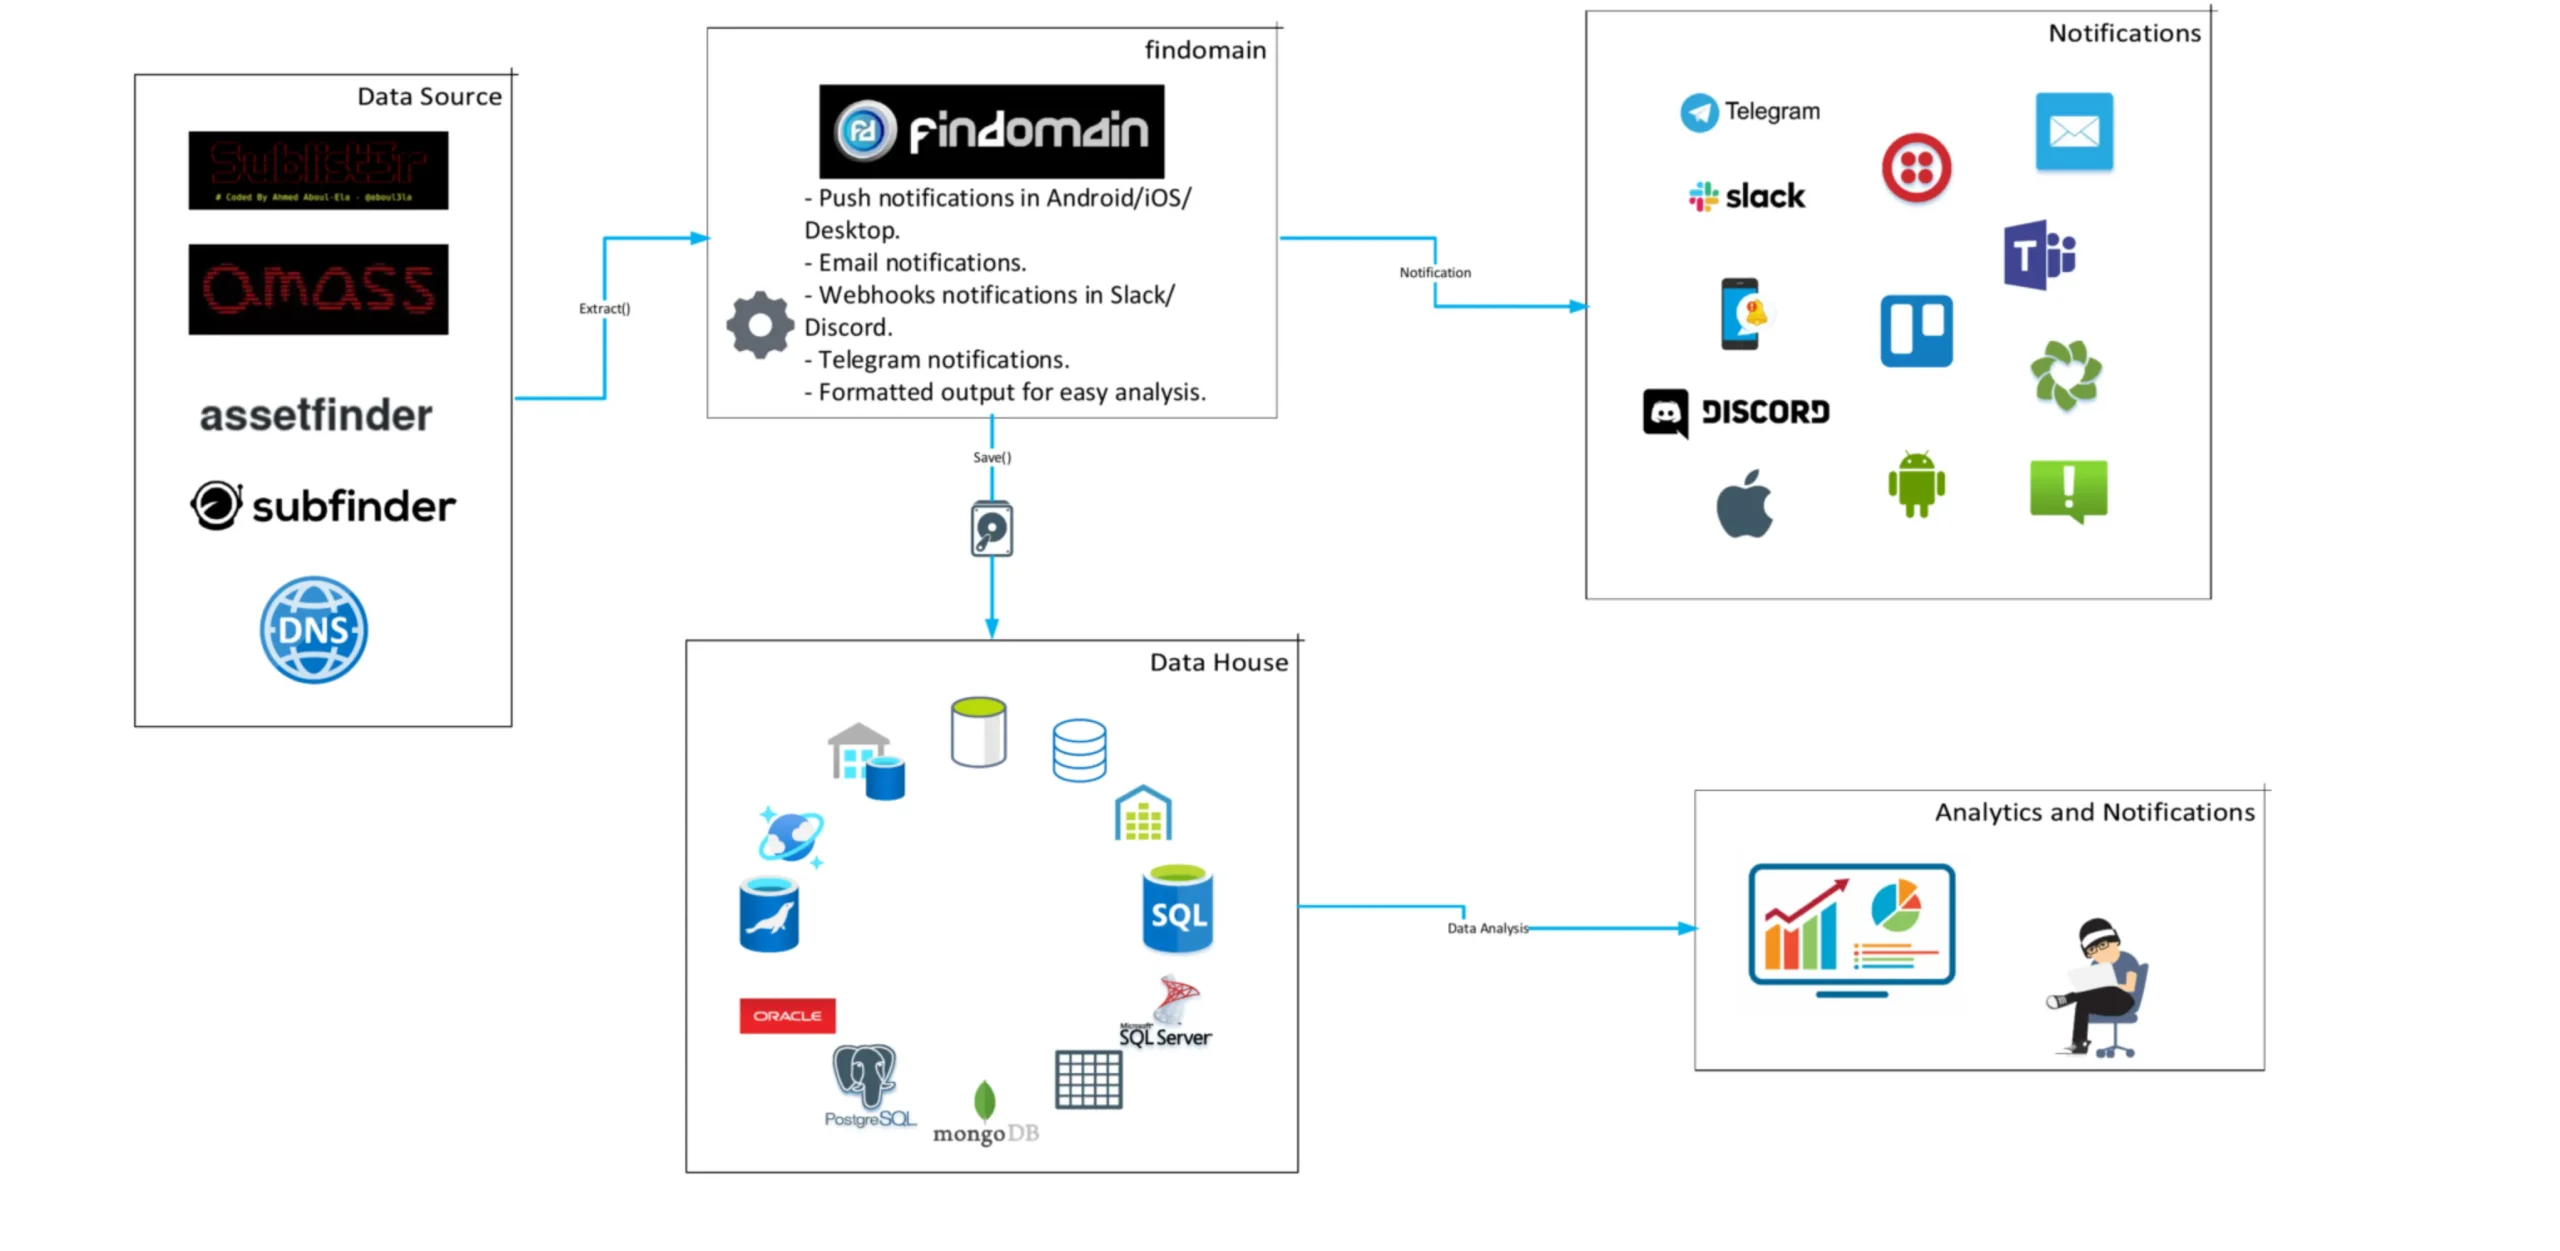
如果您不想处理服务器和复杂的配置来进行侦察,但又想在集成解决方案中拥有更多功能,Findomain 提供了一个子域监控服务,该服务提供: 目录模糊测试/端口扫描/漏洞发现(使用 Nuclei) – 等等允许您使用多个顶级工具(OWASP Amass、Sublist3r、Assetfinder 和 Subfinder)监控目标域,并在新子域出现时向 Discord、Slack、Telegram、电子邮件或推送通知(Android/iOS/Smart Watch/Desktop)发送警报成立。您唯一需要做的就是使用您的电子邮件地址(如果适用)或/和 webhooks/Telegram 聊天信息配置一个文件,并将您的域放在另一个文件中,一旦你完成了这项工作,你就有了一个全自动的子域监控服务,可以让你及时了解新发现的子域、主机 IP、HTTP 状态、HTTP 网站的屏幕截图、开放端口、子域 CNAME 等等。您的所有数据都安全地保存在关系数据库中,您可以随时请求转储数据。
完成付款后,您将收到一封电子邮件,其中包含有关如何填写配置文件和其他详细信息的服务器凭据和文档。
注意:我们的私人版本优于公共版本,使用最后一个您无法获得相同的结果,另外,如果您使用我们的服务,您可以帮助我们保持项目的活力,我们将在每 X 次发布此 repo 的附加功能时间。
域识别的完整解决方案。支持截屏、端口扫描、HTTP 检查、从其他工具导入数据、子域监控、通过 Discord、Slack 和 Telegram 发出警报、源的多个 API 密钥等等。
特征
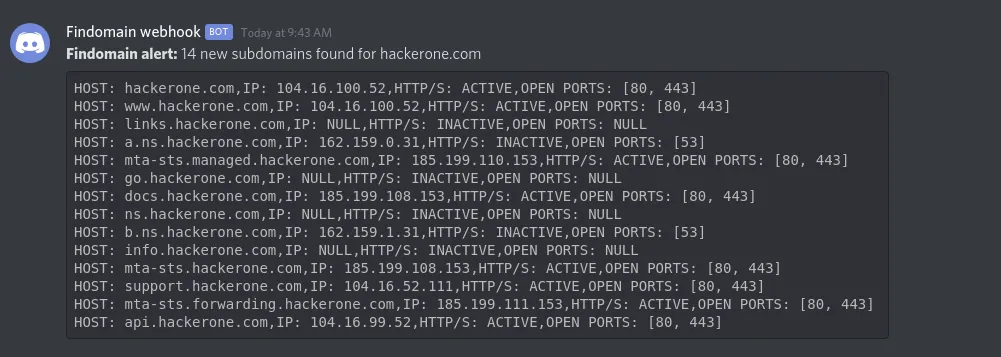
- 子域监控:将数据放入 Discord、Slack 或 Telegram webhook。有关详细信息,请参阅子域监控。
- 对 API 查询的多线程支持,这使得 Findomain 搜索任何目标的子域所需的最长时间为 15 秒(在 API 超时的情况下)。
- 并行支持子域解析,在良好的网络条件下,每分钟可以解析大约 3.5k 个子域。
- DNS over TLS 支持。
- 特定的 IPv4 或 IPv6 查询支持。
- 无需暴力即可发现子域,该工具使用证书透明度日志和 API。
- 仅发现已解析的子域。
- 发现用于数据分析的子域 IP。
- 从用户参数 (-t) 或文件 (-f) 读取目标。
- 写入用户指定的一个唯一输出文件,所有或仅解析子域。
- 将结果写入自动命名的 TXT 输出文件。
- 能够直接查询使用子域监控创建的 Findomain 数据库以查找以前发现的子域。
- 能够导入和处理其他工具发现的数据。
- 安静模式以静默方式运行。
- 跨平台支持:任何平台,它都是用 Rust 编写的,Rust 是多平台的。有关说明,请参阅文档。
- 多种 API 支持。
- 可以用作子域解析器。
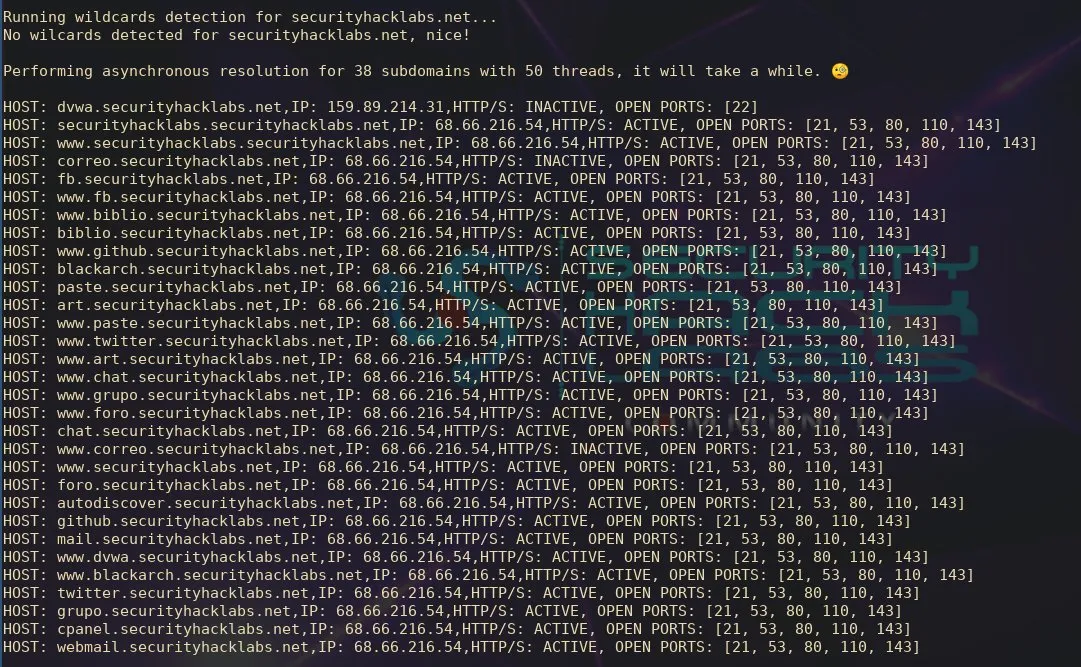
- 子域通配符检测以获得准确的结果。
- 支持使用蛮力方法发现子域。
- 支持 TOML、JSON、HJSON、INI 或 YAML 格式的配置文件。
- 用于快速子域解析的自定义 DNS IP 地址(默认情况下每秒超过 60 个,可使用该
--threads选项进行调整。
原理
它工具不使用子(域)发现的常用方法,该工具使用证书透明度日志和经过良好测试的特定 API 来查找子域。它的方法使它成为最快速和可靠的工具。该工具利用多个公共可用 API 来执行搜索。如果您想了解有关证书透明度日志的更多信息,请阅读https://www.certificate-transparency.org/
我们目前正在使用的 API:
- Certspotter
- Crt.sh Database (favorite) or Crt.sh HTTP API
- Virustotal
- Sublist3r
- Facebook
** - Spyse (CertDB)
* - Bufferover
- Threatcrowd
- Virustotal with apikey
** - AnubisDB
- Urlscan.io
- SecurityTrails
** - Threatminer
- C99
** - Archive.org
- CTSearch
备注
**标有的API需要访问令牌才能工作。在Findomain 文档中搜索如何配置和使用它。
标有 的 API*可以选择与访问令牌一起使用,如果您开始遇到该 API 的问题,请创建一个。在Findomain 文档中搜索如何配置和使用它。
安装方法
我们提供可用于以下平台的二进制文件(均仅适用于 64 位):
如果您需要在另一个平台上运行 Findomain,请继续阅读文档。
为 32 位或其他平台构建
二进制文件
自 4.0.1 版本以来,唯一具有预编译二进制文件的 32 位平台是 Linux,请按照以下步骤使用预编译二进制文件:
$ wget https://github.com/findomain/findomain/releases/latest/download/findomain-linux-i386
$ chmod +x findomain-linux-i386
$ ./findomain-linux-i386
如果您想为您的 32 位系统或其他平台构建该工具,请按照以下步骤操作:
- 克隆存储库或下载发布源代码。
- 提取发布源代码(仅当您下载了压缩文件时才需要)。
- 转到源代码所在的文件夹。
- 执行
cargo build --release - 现在你的二进制文件在
target/release/findomain里面,你可以使用它了。
安卓安装(Termux)
安装Termux包,打开它并按照它的命令:
$ pkg install rust make perl
$ cargo install findomain
$ cd $HOME/.cargo/bin
$ ./findomain
使用源代码在 Linux 中安装
如果要安装它,可以手动编译源代码或使用预编译的二进制文件。
$ git clone https://github.com/findomain/findomain.git
$ cd findomain
$ cargo build --release
$ sudo cp target/release/findomain /usr/bin/
$ findomain
使用编译的工件在 Linux 中安装
$ wget https://github.com/findomain/findomain/releases/latest/download/findomain-linux
$ chmod +x findomain-linux
$ ./findomain-linux
如果您使用的是ArchLinux发行版或任何基于 ArchLinux 的发行版,您只需要使用:
$ pacman -S findomain
如果你使用的是Pentoo发行版,你只需要使用:
$ emerge -a findomain
Aarch64安装
$ wget https://github.com/findomain/findomain/releases/latest/download/findomain-aarch64
$ chmod +x findomain-aarch64
$ ./findomain-aarch64
ARMv7安装
$ wget https://github.com/findomain/findomain/releases/latest/download/findomain-armv7
$ chmod +x findomain-armv7
$ ./findomain-armv7
Windows安装
从https://github.com/findomain/findomain/releases/latest/download/findomain-windows.exe
下载二进制文件
打开 CMD shell 并转到下载 findomain-windows.exe 的目录。
执行:findomain-windows在 CMD 外壳中。
MacOS安装
在 MacOS 中安装 Findomain 有两种选择。
使用自制软件:
$ brew install findomain
$ findomain
从 repo 手动:
$ wget https://github.com/findomain/findomain/releases/latest/download/findomain-osx
$ chmod +x findomain-osx.dms
$ ./findomain-osx.dms
NixOS安装
$ nix-env -i findomain
$ findomain
Docker安装
在 docker 容器中安装 Findomain 有两种选择。
使用 Dockerhub:
$ docker pull edu4rdshl/findomain:latest
$ docker run -it edu4rdshl/findomain:latest /bin/bash
$ findomain
构建 docker 镜像:
请参阅文档。
将 Findomain 更新到最新版本
要将 Findomain 更新到最新版本,您可以在某些情况下:
- 您下载了预编译的二进制文件:如果您使用的是预编译的二进制文件,则需要下载新的二进制文件。
- 您在 ArchLinux 或任何基于 Arch 的发行版中使用它:只需运行
pacman -Syu - 您已经克隆了 repo 并从源代码编译它:您只需转到克隆 repo 的文件夹并运行:
git pull && cargo build --release,完成后,您的可执行文件位于target/release/findomain. - 您下载了源代码版本并对其进行了编译:您需要下载新的源代码版本并再次编译。
- 我使用 cargo install findomain:然后运行
cargo install findomain.
访问令牌配置
在部分中,您可以找到有关如何配置需要或可以与访问令牌一起使用的 API 的步骤。
配置 Facebook API
历史
当我一开始添加Facebook CT API时,我提供了一个Webhook 令牌来在 API 中搜索,结果当很多用户使用相同的令牌时,达到了限制,用户无法再在 Facebook API 中搜索,直到Facebook再次解锁。从 Findomain 版本 0.2.2 开始,用户可以为 webook 设置自己的 Facebook 访问令牌,并将其传递给 findomain 设置findomain_fb_token系统变量。此处介绍了更改。此外,自 2019 年 8 月 23 日起,我删除了提供该 API 令牌的 webhook,它不再起作用,如果您使用的是 findomain < 0.2.2,您会受到影响,请使用 >= 0.2.2 的版本。
从 Findomain 0.2.4 开始,您不需要findomain_fb_token在系统中显式设置变量,如果您不设置该变量,那么 Findomain 将使用我们为 Facebook CT API 提供的访问令牌之一,否则,如果您设置环境变量然后 Findomain 将使用您的令牌。看到它提交。请,如果您可以创建自己的令牌,请执行此操作。当很多人使用访问令牌时达到使用限制,然后该工具将失败。
获取 Webhook 令牌
第一步是获取您的 Facebook 应用程序令牌。您需要创建一个 Webhook,按照以下步骤操作:
- 打开https://developers.facebook.com/apps/
- 单击“创建应用程序”,选择“无”,然后选择“下一步”。
- 输入所需的“显示名称”,然后单击“下一步”。
- 在下一个屏幕中,搜索“Webhooks”并单击“设置”。
- 转到“配置”->“基本”,然后单击“应用程序密钥”选项中的“显示”。
- 现在在浏览器中打开以下 URL:https ://graph.facebook.com/oauth/access_token?client_id={your-app-id}&client_secret={your-secret-key}&grant_type=client_credentials
注意:替换{your-app-id}为您的 webhook 标识符的编号和{your-secret-key}您在第 4 步中获得的密钥。
- 你应该有一个像这样的 JSON:
{
   “access_token”:“ xxxxxxxxxx|yyyyyyyyyyyyyyyyyyyyyy ”,
   “token_type”:“承载”
}
- 保存
access_token值。
现在您可以使用该值来设置访问令牌,如下所示:
基于 Unix 的系统(Linux、BSD、MacOS、带有 Termux 的 Android 等):
放入你的终端:
$ findomain_fb_token="YourAccessToken" findomain -(options)
windows系统:
放入 CMD 命令提示符:
> set findomain_fb_token=YourAccessToken && findomain -(options)
注意:在 Windows 中,您需要转义特殊字符,如|,在特殊字符之前添加^以转义它并且不要引用标记。例子: set findomain_fb_token=xxxxxxx^|yyyyyyyy && findomain -(options)
提示:如果您不想在每次运行 findomain 时都写入访问令牌,请findomain_fb_token在基于 Unix 的系统中导出,如放入export findomain_fb_token="YourAccessToken"您的系统中,并按照此处所述在您的 Windows 系统中.bashrc设置变量。findomain_fb_token
将 Spyse API 配置为与令牌一起使用
- 打开https://account.spyse.com/register并进行注册过程(包括电子邮件验证)。
- 登录到您的 spyse 帐户并转到https://account.spyse.com/user
- 搜索“API 令牌”部分并单击“显示”。
- 保存该访问令牌。
现在您可以使用该值来设置访问令牌,如下所示:
基于 Unix 的系统(Linux、BSD、MacOS、带有 Termux 的 Android 等):
放入你的终端:
$ findomain_spyse_token="YourAccessToken" findomain -(options)
windows系统:
放入 CMD 命令提示符:
> set findomain_spyse_token=YourAccessToken && findomain -(options)
注意:在 Windows 中,您需要转义特殊字符,如|,在特殊字符之前添加^以转义它并且不要引用标记。例子: set findomain_spyse_token=xxxxxxx^|yyyyyyyy && findomain -(options)
提示:如果您不想在每次运行 findomain 时都写入访问令牌,请findomain_spyse_token在基于 Unix 的系统中导出,如放入export findomain_spyse_token="YourAccessToken"您的系统中,并按照此处所述在您的 Windows 系统中.bashrc设置变量。findomain_spyse_token
将 Virustotal API 配置为与令牌一起使用
- 打开https://www.virustotal.com/gui/join-us并进行注册过程(包括电子邮件验证)。
- 登录到您的 Virustotal 帐户并转到https://www.virustotal.com/gui/user/YourUsername/apikey
- 搜索“API 密钥”部分。
- 保存该 API 密钥。
现在您可以使用该值来设置访问令牌,如下所示:
基于 Unix 的系统(Linux、BSD、MacOS、带有 Termux 的 Android 等):
放入你的终端:
$ findomain_virustotal_token="YourAccessToken" findomain -(options)
windows系统:
放入 CMD 命令提示符:
> set findomain_virustotal_token=YourAccessToken && findomain -(options)
注意:在 Windows 中,您需要转义特殊字符,如|,在特殊字符之前添加^以转义它并且不要引用标记。例子: set findomain_virustotal_token=xxxxxxx^|yyyyyyyy && findomain -(options)
提示:如果您不想在每次运行 findomain 时都写入访问令牌,请在您的操作系统中导出相应的系统变量。对于基于 Unix 的系统,可以将其export findomain_virustotal_token=YourAccessToken放入您的.bashrc. 对于 Windows 系统,可以按照此处或此处的说明进行操作。
配置 SecurityTrails API
获取 API 密钥
第一步是获取您的 SecurityTrails 令牌。按照以下步骤操作:
- 打开https://securitytrails.com/
- 点击“免费注册”(右上角)。
- 填写要求的字段,您需要输入有效的电子邮件地址,用于验证。.
- 选择您喜欢的 API 定价计划,免费计划限制为每月 50 次查询。点击“开始”。
- 确认电邮地址。
- 在左侧面板中选择“Credentials”,这里有 API Key。
现在您可以使用该值来设置访问令牌,如下所示:
基于 Unix 的系统(Linux、BSD、MacOS、带有 Termux 的 Android 等):
放入你的终端:
$ findomain_securitytrails_token="YourAccessToken" findomain -(options)
windows系统:
放入 CMD 命令提示符:
> set findomain_securitytrails_token=YourAccessToken && findomain -(options)
注意:在 Windows 中,您需要转义特殊字符,如|,在特殊字符之前添加^以转义它并且不要引用标记。例子: set findomain_securitytrails_token=xxxxxxx^|yyyyyyyy && findomain -(options)
提示:如果您不想在每次运行 findomain 时都写入访问令牌,请findomain_fb_token在基于 Unix 的系统中导出,如放入export findomain_securitytrails_token="YourAccessToken"您的系统中,并按照此处所述在您的 Windows 系统中.bashrc设置变量。findomain_fb_token
子域监控
Findomain 能够监控特定域或新子域的域列表,并将数据发送到Slack、Discord或Telegram webhook。您所需要的只是一台服务器或安装了 PostgreSQL数据库服务器的计算机。请记住,您只能安装一个安装了 PostgreSQL 的中央服务器/计算机,并从任何地方连接到它以执行监视任务。
重要提示: Findomain 是子域枚举和监控工具,而不是作业调度程序。如果要自动运行 findomain,则需要配置作业调度程序,如systemd-timers或 *NIX 系统中众所周知的CRON、Android 或 MAC 中的 Termux 以及 Windows 中的Windows 任务调度程序。
这是一篇文章,介绍了使用 *NIX 系统的计划CRON作业监视域的过程 –使用 findomain、PostgreSQL 和 Webhooks 进行自动子域扫描
选项
使用子域监控功能时,您可以设置以下命令行选项:
        --postgres-database <postgres-database>    Postgresql database.
        --postgres-host <postgres-host>            Postgresql host.
        --postgres-password <postgres-password>    Postgresql password.
        --postgres-port <postgres-port>            Postgresql port.
        --postgres-user <postgres-user>            Postgresql username.
可配置的系统变量
Findomain 读取系统变量以使用 webhook。目前 Findomain 支持以下 webhook(单击它们以查看如何设置 webhook):

您拥有的可用系统变量是:
findomain_discord_webhook: Discord webhook URL.
findomain_slack_webhook: Slack webhook URL.
findomain_telegrambot_token: Telegram bot autentication token.
findomain_telegrambot_chat_id: Unique identifier for the target chat or username of the target channel.
提示:如果您不想每次运行 findomain 时都编写 webhook 参数,请在您的操作系统中导出相应的系统变量。对于基于 Unix 的系统,可以将其export VariableName="VariableValue"放入您的.bashrc. 对于 Windows 系统,可以按照此处或此处的说明进行操作。
连接到数据库服务器时的默认值
Findomain 有一些在未设置时使用的默认值。它们在下面列出:
- 如果您只指定
-m没有更多参数的标志或不指定 Findomain 设置的选项之一:
- 数据库主机:localhost
- 数据库用户名:postgres
- 数据库密码:postgres
- 数据库端口:5432
- 数据库:默认 PostgreSQL 数据库集群
子域监控示例
- 使用特定的用户名、密码和数据库连接到本地计算机和本地 PostgreSQL 服务器,并将数据推送到 Discord 和 Slack webhook
$ findomain_discord_webhook='https://discordapp.com/api/webhooks/XXXXXXXXXXXXXXX' findomain_slack_webhook='https://hooks.slack.com/services/T00000000/B00000000/XXXXXXXXXXXXXXXXXXXXXXXX' findomain -m -t example.com --postgres-database findomain --postgres-user findomain --postgres-host localhost --postgres-port 5432
- 使用特定的用户名、密码和数据库连接到远程计算机/服务器和远程 PostgreSQL 服务器,并将数据推送到 Discord 和 Slack webhook
$ findomain_discord_webhook='https://discordapp.com/api/webhooks/XXXXXXXXXXXXXXX' findomain_slack_webhook='https://hooks.slack.com/services/T00000000/B00000000/XXXXXXXXXXXXXXXXXXXXXXXX' findomain -m -t example.com --postgres-user postgres --postgres-password psql --postgres-host 192.168.122.130 --postgres-port 5432
- 使用特定的用户名、密码和数据库连接到远程计算机/服务器和远程 PostgreSQL 服务器,并将数据推送到 Telegram webhook
$ findomain_telegrambot_token="Your_Bot_Token_Here" findomain_telegrambot_chat_id="Your_Chat_ID_Here" findomain -m -t example.com --postgres-user postgres --postgres-password psql --postgres-host 192.168.122.130 --postgres-port 5432
- 使用默认值连接到本地计算机
$ findomain_discord_webhook='https://discordapp.com/api/webhooks/XXXXXXXXXXXXXXX' findomain_slack_webhook='https://hooks.slack.com/services/T00000000/B00000000/XXXXXXXXXXXXXXXXXXXXXXXX' findomain -m -t example.com
用法
请参阅findomain -h/--help以查看所有选项。
对于子域监控示例子域监控以获取更多信息。
您可以通过两种方式使用该工具,仅发现域名或发现域+IP地址。
例子
- 搜索子域并在屏幕上打印信息:
findomain -t example.com- 搜索子域并将数据导出到输出文件(在这种情况下,输出文件名为 example.com.txt):
findomain -t example.com -o- 搜索子域并将数据导出到自定义输出文件名:
findomain -t example.com -u example.txt- 只搜索可解析的子域:
findomain -t example.com -r- 仅搜索可解析的子域,将数据导出到自定义输出文件。
findomain -t example.com -r -u example.txt- 从使用文件传递的域列表中搜索子域(您需要在文件的每一行中放入一个域):
findomain -f file_with_domains.txt- 从使用文件传递的域列表中搜索子域(您需要在文件的每一行中放入一个域)并将所有解析的域保存到自定义文件名中:
findomain -f file_with_domains.txt -r -u multiple_domains.txt- 查询使用Subdomains Monitoring创建的 Findomain 数据库。
findomain -t example.com --query-database- 查询使用Subdomains Monitoring创建的 Findomain 数据库并将结果保存到自定义文件名。
findomain -t example.com --query-database -u subdomains.txt- 从多个文件导入子域并在子域监控过程中使用它们:
findomain --import-subdomains file1.txt file2.txt file3.txt -m -t example.com项目地址
GitHub:
https://github.com/Findomain/Findomain
转载请注明出处及链接